 |
 |
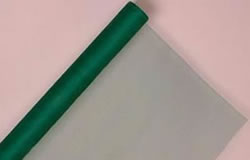
Glass fibre mesh fabric is used in Australia and Europe as replacement screening. It is made of coated fiberglass mesh cut to window frame size and easy for installation by DIY. Fiberglass replacement window screen is a popular form of insect screening in Western market.
Fiberglass Replacement Screen Mesh is made with fiber glass filament yarn.
Materials: Fiberglass yarn or wire.
Weaving and characteristic: Weaving including I mould II Mould.
It is light, the toughness is fine. corrosion-resisting. ventilate. Clear easily.
Uses: used to prevent mosquito in hotel, public building and civil residence, etc.
Please find below details to replacement the window screen.
Step 1: Choose the Right Screen Material:
The vinyl coated fiberglass mesh fabrics are the most durable types of screen mesh and come in a variety of colors and shades. This is the mostly used screen mesh for replacement windows.
Step 2: Cut the Replacement Material to Size
After you've removed the screen frame from the window, lay the frame on a flat surface and roll out enough replacement screen that it covers the entire frame. Make a cut across the roll with sufficient excess to clamp around the edges of the frame while you work.
Step 3: Remove the Old Screen
The screen is held in the frame by a plastic spline that runs along a channel around the perimeter of the frame. Use a nail-punch or other sharp object to loosen the end of the spline and pull it up from the channel and out of the frame. The screen should come out easily once you've removed the spline. It may be helpful to wash the screen frame before continuing, or you can use compressed air to blast out any dirt.
Step 4: Lay the New Screen Across the Frame
When laying the new screen over the frame, lay it out with the curved or concave side down. This will make it easier to install the screen and ensure that the new piece lies flat in the frame. You can then use clamps to hold the screen taut onto the frame while you work.
Step 5: Replace the Spline
It's advisable in most cases to replace the spline along with the screen material. Spline is inexpensive and can be purchased at most home stores.
Once you've creased the screen all the way around the frame, begin placing the spline in the channel. Start on one side and use your fingers to push the spline into the channel from one side of the screen to the other. Try to install the material so that it is neat and flat, but don't worry about getting the screen overly tight.
Step 6: Press the Spline into the Window Frame
Unspool a length of spline and install it by pressing it into the frame's groove using a rolling spline-tool. Gently pull the spline tight with one hand as you carefully press it into the groove with the roller. As the spline goes into the groove, it helps pull the screen taut.
When you reach the corners of the frame where the roller won't reach, use a flat-head screwdriver to press the spline into the corner. Always work in the same direction with the roller -- don't back the wheel up. Be careful not to allow the roller to slip out of the groove as it could damage the screen mesh.
Step 7: Cut Away the Excess Fabric Along the Window Frame
When you have installed spline all the way around the frame and come back to the starting point, trim the spline to length using a utility knife. Also use the utility knife to trim off the excess screen mesh from the outside of the frame. Allow the blade to ride along the outside of the frame's groove to ensure a straight, clean cut.
For our fiberglass reinforced mesh fabrics, send email to: screen@fiberglassscreen.org
- Fire-Retardant Fiberglass Mesh
- Fiberglass Propylene Polymer Self Adhesive Mesh
- Fiberglass Mesh with Covering PVC
- Fiberglass Mesh Strips Cut to Size
- C Glass Fiberglass Mesh
- Plisse Screen Mesh for Windows and Doors
- Fiberglass Mesh Building Materials
- Fiberglass Mesh
- Fiberglass Insect Screen
- Charcoal Fiberglass Window Screen
- Fiberglass Sunshade Screen.
- Fiberglass Geogrid Fabrics
- Fiberglass Portiere
- Glass Fibre Mesh Fabrics of Ducting.
- Coated Alkaline-resistant Fiberglass Mesh
- fiberglass self-adhesive joint tape
- Fiberglass Mosaic Tile Mesh
- Fiberglass Mesh Tape
- Fiberglass Mesh for Concrete Reinforcing
- fiberglass screen
- Tips on Using Fiberglass Mesh for Wall Plastering
- Fiberglass Screening for Enclosures
- Fiberglass Replacement Screen
- Solar Fiberglass Screen Mesh
- Wire Mesh Market
- Wetter Stainless Steel Wire Mesh
- Anping Barbed Wire Factory
- Hope Wire Mesh Factory
- Expanded Metal Factory
- Anping Chain Link Fence Factory